Find me on these platforms

Show & Share with Virginia: Looking at the Watercolor Brush Markers from Altenew

Hello fellow creators!
Today I have a Show & Share coloring project featuring Watercolor Brush Markers.  And since I'm playing along with Kathy Racoosin's coloring challenge, #THEDAILYMARKER30DAY, where we are encouraged to color for 10 minutes a day for the month of February, I wanted to practice using the Spring Garden Set and Winter Wonderland Set from Altenew.

Here is what I shared on my IG feed.

I first started by stamping and masking the pretty poppy image from Gina K designs: Through Think and Thinonto Distress Ink watercolor paper. 
Going for a no-line-coloring look, I chose inks that are water soluble for inking the images.
Then I chose Rouge and  Rubellite Watercolor Brush Markers to layer color in the petal areas. I really like the soft mix of peach/red that is created by mixing the two colors and layering them on top of each other straight from the markers themselves being careful to allow for the ink to dry on petals that were next to each other.

Thinking of Chocolate Covered Strawberries....


In choosing the color for the leaves, I must have been craving those valentine delights of Chocolate covered strawberries! Yes, I am a Choc-A-Holic!
The Espresso Watercolor Brush Marker was a scrumptious choice in my opinion! I added clear water from a water-brush to get varied shades of the espresso on the leaves. I also added a kiss of it to the places I thought needed more shadow depth on the petals.
I'm happy with how things are looking at this point. the flowers are light in color which is what I was going for.

Adding color to the center of each flower: 

****At this point I added Ruby Red Watercolor Brush Marker to deepen the shadows of the petals and I feel it got much too dark. It looks okay, but I was hoping for softer peach colored bloom. But that Strawberry image kept creeping into my head. so RED it became :)

Moving to the background


Added more detail to petals and leaves with a Fine Liner pen

Splattered more color onto the Dry background for tiny flecks of color directly from the water brush markers

***tapping the marker with another brush or pencil creates a very fine fleck/splatter  


 To finish the card 


I'm pleased with how it turned out, even if it is darker in color than I had hoped. With more practice, I might be able to keep it soft and light :) 

The question was raised on my IG about how these Watercolor Brush Markers compare to 
Kuretake ZIG Clean Color Real Watercolor Brush Pens, (ziggys)


My findings:

Watercolor Brush Markers:

  • There are currently 19 colors in the two sets, (Spring Garden Set and Winter Wonderland Set)
  • I've been using them since October 2018
  • Are much more vibrant in color than the Ziggys , a little goes a LONG way. 
  • When mixed with clean water onto a palette or stamped image, the colors dry very bright and not washed out unless a lot of clean water is added 
  • One drop of color is enough for a large coloring space 
  • Color can be flicked onto an image like an alcohol marker without any added water..which is my preferred way of coloring with brush markers
  • The brush has a fine point tip, almost as fine as the ziggys
  • It takes some practice to control the flow of color
  • paper is very important for ease of use...that being said, I have not figured out which paper I like to use with these yet...I know I like the Bristol Smooth for the ziggys

Here is my first blog post coloring with the Altenew Watercolor Brush Markers:

My findings:

Kuretake ZIG Clean Color Real Watercolor Brush Pens

  • I have all 90 colors and have been using them since July 2015
  • It took me 6 months to figure out that I liked using the Ziggys without water, directly from the pen
  • Bristol Smooth 100 lb. paper is my choice to color on 
  • Color can be flicked onto an image like an alcohol marker without any added water..which is my preferred way of coloring with brush markers
  • Very fine brush tip that is fabulous for detail coloring
  • The pens run out/get used up very quickly, I have replaced my favorite 40 colors twice already

Here is my first blog post featuring the Ziggys:


****I am not a fan of the Arteza markers because the brush tip separates continually, making it impossible to color detailed images. (they have been given to my children to use)

Here is an IG post sharing a visual comparison of the same image using three different Watercolor Brush markers, colored without adding any water: Click here to see close-up photos

Hope you enjoyed my coloring Show & Share journey today! Feel free to ask questions in the comment section below.
***As a disclaimer, I purchased all the Watercolor Brush Markers compared in this post with my own money. These are my unprofessional coloring opinions posted here in hopes that you  choose what works best for you :)

You can also find me:
Instagram @mammacooksalot  
YouTube: Mamma LauraJane.

Joining the fun on Virginia's blog for  "Show and Share".


Thanks for stopping by and have a Blessed day!
LauraJane :)

****I am part of Altenew's affiliate program. Which means I earn a small commission at no additional cost to you every time you click through and purchase Altenew product(s) linked in this post. Thank you for your support!


Altenew Artist Markers Set D Release Blog Hop + Giveaway + Video


Hello and welcome to my stop of the Altenew Artist Marker Set D Release Blog Hop. I'm excited and honored to have been able to color with this new alcohol marker set!  As you can see, the colors are SCRUMPTIOUS and perfectly coordinate with the corresponding Crisp Ink Collections :)
The 3 Collections by name are; Rose PetalCoffee Break, and Sea Shore.
Now there are 6, 12 count multi color Artist Marker sets; A,B,C,D,E and a Primary color set. Altenew also has sets of four markers in single Collections released for purchase.


My hope is that you are inspired by what you see! If you are hopping from the beginning then you should be arriving from the blog of Lydia Fiedler. I have a 4 projects to share with you today :)

Here are my cards:


First up I have a card featuring a Shiplap/Farmhouse wood background created with the rich Coffee Break browns in Set D. Inspired by Dawn Woleslagle, who shared awhile back how to create the look with distress inks, I wanted to see if I could create a similar background with markers.
I LOOOVE how it turned out and share a quick video on my YouTube channel on coloring the background.

After creating the Wood background: 


Supplies:

ARTIST MARKERS: Set D
PAPER: Pastel Dreams 6x6 Paper Pack, Neenah Solor White 80lb

Here is the video of how to make the Faux shiplap/wood panel. You can watch below or at my You Tube Channel in HD.

*******
Wanting to really play with all the colors together, from the new Artist Marker Set D, I stamped the beautiful Handpicked Bouquet  onto Neenah Solor White and enjoyed some coloring therapy for the next card.
Can you see that interesting mottled look on the petals of the rose bloom? That is achieved by using the Artist Markers Colorless Blender. I like the softness that it gives to the image.

After I finished coloring of the Handpicked Bouquet using Set D and Artist Markers Summer Afternoon Set:

  • I used the coordinating die to quickly cut the bouquet out
  • Then cut a second bouquet and colored it entirely with Lagoon B815, from Set D, for a shadow layer
  • Adhered the two die cuts slightly off-set
  • Layered it onto the remaining shiplap/wood panel and set aside
  • Stamped the largest image from Extra Special Stamp Set onto white cardstock using Rocky Shores Crisp ink
  • Added a small strip,1.75 x 5.5 inches of pattern paper from Pastel Dreams 6x6 Paper Pack
  • Sentiment is stamped with Mocha  Crisp ink
  • Assembled the card

Supplies:

PAPER: Pastel Dreams 6x6 Paper Pack, Neenah Solor White 80lb

*******
I created another wood panel, this time with the Sea Shore collection markers. Remember to watch my video on how to create your own faux shiplap. Talk about Zen coloring, making these panels is Quick and FUN!


Supplies:

ARTIST MARKERS: Set D
PAPER: Neenah Solor White 80lb
*******

Because I do LOVE coloring along with Kathy Rac and #TheDailyMarker30Day coloring challenge:  My last card is a One Layer inspired by Altenew DT member, Erum Tasneem.  

Keeping an image mostly white is a challenge that I like to try every once in a while.

To make this card:

Supplies:

INKS: Coffee Break Mini Cube Set
ARTIST MARKERS: Set DArtist Markers Set E
PAPER: Neenah Solor White 80lb
OTHER: Watercolor Stripes Stencil

********
Prizes:
To celebrate this release, Altenew is giving away a $50 gift certificate to 6 lucky winners! Please leave a comment on the Altenew Card Blog and/or Altenew Scrapbook Blog by 2/13/2019 for a chance to win. Six winners will be announced on the Altenew blogs on 2/16/2019.

2nd Giveaway:
Altenew has graciously allowed me to draw a winner, from comments left here on my blog, to receive a $30 gift certificate! I will announce the winner 2/15/2019.

EDITED:

Your video was fun & easy to follow thank you. Like all your cards especially the love story. Thank you for sharing cards & how to video.

Congratulations Andrea! Please contact winner@altenew.com by 2/28/2019 with the subject line 'Altenew 2/7/2019 Release Blog Hop Winner from LauraJane's Blog'.

Your next stop on the hop is Svitlana Shayevich.

Blog hop order:


Just in case you missed it! February 2019 release collection page

Thanks for taking time to stop by. 
Hope you are inspired to create something you LOVE!
LauraJane:)

****I am part of Altenew's affiliate program. Which means I earn a small commission at no additional cost to you every time you click through and purchase product(s) linked in this post. Thank you for your support!

FREE U.S. shipping with code: USFREE
or $5 OFF international shipping with code : SHIP7OFF  at checkout. 
Current Altenew Promotions Page: find all the current deals and promotions at Altenew in one place!

You can also find me:
Instagram @mammacooksalot  
YouTube: Mamma LauraJane.


Altenew Build-A-Flower: Japanese Mum Release Blog Hop + Giveaway + Video


Hello Everyone! Happy February 1st and Friday!

I'm super excited to be joining the Altenew Build-A-Flower: Japanese Mum Release Blog Hop today!  If you are hopping along from the beginning you should be arriving from the incredibly talented Patricia Roebuck blog. This Build-A-Flower: Japanese Mum is yet another gorgeous multi-layer stamp set with coordinating dies perfect for all your flowering craft projects!

Take a look:


Build-A-Flower: Japanese Mum
Prizes:
To celebrate this release, Altenew is giving away a $30 gift certificate to 6 lucky winners! Please leave a comment on the Altenew Card Blog and/or Altenew Scrapbook Blog for a chance to win. Three winners will be announced on the Card Blog, and other three winners will be announced on the Scrapbook Blog on 2/9/2019.

Additional Giveaway:
I will draw a winner to receive a $20 gift certificate and announce the winner on this blogpost by 2/6/2019

I have four cards to share with you today. There were so many ideas in my head :) Warning: this is a photo heavy post.
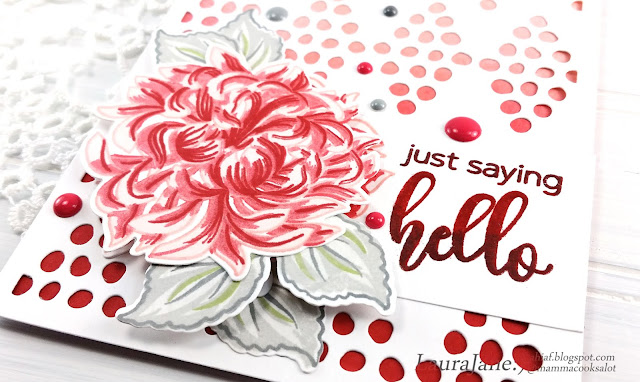
For the first card I stamped all the layers of the Build-A-Flower: Japanese Mum and used the coordinating dies, then popped them up on cover die panel. The camera rolling to capture the process for this card. You can watch the video below or in HD on my YouTube channel.

 Other supplies: Doodled Dots Cover Die

*******
Build-A-Flower: Japanese Mum Bundle: (5% discount)
Using on trend colors from the Build-A-Flower: Japanese Mum Bundle for the following card.
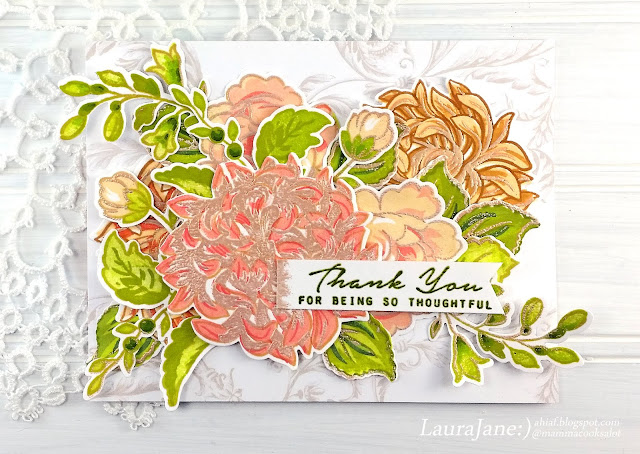
Paired with Handpicked Bouquet Stamp & Die ,and several of the Japanese Mums, the gorgeous Golden Peach Crisp Embossing Powder adds a kiss of sparkle! All are layered on top of pattern paper.
Other supplies:
*******

Below is the layering guide for the new set:

With just a bit of masking, all four layers in the Build-A-Flower: Japanese Mum look fabulous in cheerful colors, for my third card; a simple one layer:)
Other supplies:

*******

Stamping the outline and solid images only of the Build-A-Flower: Japanese Mum give an altogether new look to the Bloom. Die cut masks add the crisp white outlines around each image. Giving it that RETRO vintage fabric look!
I LOVE how this turned out!
Other supplies:
*******

Did you know that Altenew has a Build-A-Flower Monthly Subscription Plan for the Build-A-Flower sets?

When signed up, you are guaranteed a spot in the monthly BAF releases and will receive a set each month - at a specially discounted price! ($35.00 →$29.99)

Your next stop is Reiko Tsuchida. Enjoy the rest of the hop!
Remember to leave a comment here and on the Altenew blogs for chances to win prizes!


Laura Jane <<<YOU are Here


EDITED:

 Winner of the $20 gift certificate goes to:
I love how Altenew offers color combo sets. Seeing the different colors combinations on your projects really helps me to identify which sets to get next. Beautiful cards and wonderful work. Thanks for sharing both the finished projects and your processes.

Congratulations Dawn! please contact Altenew at  winner@altenew.com by 2/15/2019 with the subject line BAF: Japanese Mum Release Blog Hop Winner from LauraJane's Blog.

Thanks for taking time to stop by. Hope you are inspired to create something you LOVE!
LauraJane:)

FREE U.S. shipping with code: USFREE
or $5 OFF international shipping with code : SHIP7OFF  at checkout. 
Current Altenew Promotions Page: find all the current deals and promotions at Altenew in one place!

You can also find me:
Instagram @mammacooksalot  
YouTube: Mamma LauraJane

****I am part of Altenew's affiliate program. Which means I earn a small commission at no additional cost to you every time you click through and purchase Altenew product(s) linked in this post. Thank you for your support!