Find me on these platforms

Autism Awareness Hop


Hello everyone! Welcome to my stop on the The Autism Awareness Blog Hop organized by the dear Veronica Zalis! We are spreading Autism Awareness across the stamping community!

I have an encouraging card for you today featuring the new Beautiful Bettas from The Ton Stamps. They will be released this week:) I stamped and embossed the pretty fish and popped them on a 'Bowl' cut from the Lavish Donut Cardbase Die


The sentiment is stamped onto the heart from the Pretty Mail coordinating die set.

The Ton prize will be a $25 gift code to our shop (gift codes only apply to The Ton branded stamps, dies, gilding and inks only) and a stamp of choice from our collection. These are two separate prizes.

Leave comments on the blogs to better your chances of winning:)

Blog Hop Order

Altenew Build-A-Flower: Hibiscus Release +Giveaway!


Happy Easter everyone! 
Welcome to my stop on the Altenew Build-A-Flower: Hibiscus Release hop. Once again, Altenew has created a LOVELY  Build-A-Flower set. This Hibiscus is BOLD and BEAUTIFUL! The Build-A-Flower: Hibiscus set includes 1 stamp set (24 images) and 1 coordinating die set (3 dies).
The layers are easily lined up for stamping, as well as perfect for COLORING with the mediums of your choice.:))
Scroll through to read how I created each card.


Build-A-Flower: Hibiscus
Hibiscus are native to warm climates and are associated with tropical weather and relaxing summer days. Hibiscus flowers have symbolized many things throughout history, but are now most commonly known to represent "delicate beauty." This set comprises of a 6 layer hibiscus flower in full bloom, a 6 layer hibiscus bud with stem, and a 4 layer leaf image. Three sentiments are also included. These floral images work well on cards, layouts, home decor, gift wrapping, and more. We can't wait to see where these beautiful tropical flowers take your imagination!

My first card features the set and inks, SHADES of PURPLE and GREEN FIELDS found in the Build-A-Flower Hibiscus Bundle


It is a one layer card
  • The 6 layer hibiscus bud with stem is stamped several times onto white card stock. SHADES of PURPLE and GREEN FIELDS mini cube sets were the inks used. 
  • I used the coordinating bud die to make masks from Post-It notes and placed them over each bud.
  • Then I proceeded to stamp the leaves with all four inks from WARM GRAY mini cubes, and made masks for the leaves with the die from the set and placed them over each leaf.
  • After all the buds and leaves were covered with masks, I reached for the Watercolor Stripe stencil and positioned it over the stamped/masked panel. Then spounged EVENING GRAY crisp ink, the third darkest ink in the set, next, added splatters with MOON ROCK..by plessing the pad onto an acrylic block, spritzing with water and flicking with a small brush.
  • The sentiment is from Halftone Hearts stamp set, inked with gradient color from  SHADES of PURPLE 


For the next card I played with the Hibiscus full bloom.

  • The background came together easily by stamping the 3rd layer of the full bloom with MORNING FROST and DEW DROPS crisp inks. I trimmed the panel down with the Creative Edges: Lace Die and added the left over strip back to the top of the panel.
  • Stamped the Hibiscus flower layers with SEA GLASS, DEW DROPS, MINTY MINT, OCEAN WAVES, and VOLCANO LAKE,  for the tiny 6th layer.
  • The stamen are inked with ORANGE CREAM and GRAPEVINE
  • Getting a little creative with the color choices for the leaves, I inked the solid layer with MINTY MINT, then mixed the following detail layers for each leaf with BAMBOO, PARROT, and VOLCANO LAKE
  • The script sentiment is inked with OCEAN WAVES across the top of the panel
  • An added pop of ORANGE CREAM splattered leaves from the Create-A-Wreath Die Set helped balance the arrangement.
  • Embellished with just a few ENAMEL DOTS 


CUTTING all the bits and peaces from the dies in the set first from white card stock, I then stamped  the 3rd layer of the HIBISCUS bloom, bud and leaves. Followed with some no-line coloring using the ARTIST MARKERS and Ziggys created yet another look for this next card.

One more one layer card for my final sample today:)
  • After stamping all the layers of the hibiscus with WARM and COZY mini ink set and TROPICAL FOREST for the leaves, I cut masks using the dies 
  • Then quickly repeat stamped the scripty sentiment words, with SUNKISSED crisp ink, as a text background. 
  • GOLD heat embossed the stamen
  • Then clear heat embossed the FIREBRICK stamped THANK YOU over the top.
  • Inked 1/4 inch of the edge of a cardbase with WARM and COZY, darkest shade at the bottom.
  • Trimmed the stamped panel down to allow the inked edge show and adhered it together


Thanks for staying around to the end of this very photo heavy post! Hope you enjoyed it and are inspired to create something soon:)

In true Altenew Release Party fashion there are prizes and giveaways for commenting on posts!

Prizes: To celebrate this release, Altenew is giving away a $30 gift certificate to six lucky winners! Please leave a comment on the Altenew Card Blog and/or Altenew Scrapbook Blog for a chance to win. Three winners will be announced on the Card Blog, and other three winners will be announced on the Scrapbook Blog on 4/8/2018.

Giveaway: You can also leave me a comment for your chance to win a $30 gift certificate.
***EDITED to announce WINNER: Altenew Build-A-Flower Hibiscus****Carmela Hubler*****
Please send an email to winner@altenew.com with the subject line BAF: Hibiscus Release Winner from LauraJane's Blog, by 4/20/2018.
Congratulations and HAPPY SHOPPING!

If you want to start the blog hop from the beginning you can go at the Altenew Card Blog.

Hope your day is BLESSED!
LauraJane:)

Just a reminder:
Altenew Card Drive : Altenew is having a card drive to collect cards for folks in nursing homes for Mother’s and Father’s Day. Find out more info HERE.


CHECK out the Altenew Sale Category you can get huge deals in the Altenew Sale Category. Find them HERE.

Links are part of affiliate program with Altenew. Which means I earn a small commission at no additional cost to you every time you click through and purchase product(s) linked in this post. Thank you for your support!

Happy Easter!

Hello Everyone! Hope you are having a Blessed Easter weekend with Family and Friends!
Just popping in to share an Easter card I made using the colors from the March 2018 Inspiration Challenge at Altenew.

I made a custom sentiment from Calligraphy Alpha and Thick and Thin Alpha sets. Stamped them with Peach Perfect and Coral Berry Crisp inks.
  • On a separate piece of 110# white cardstock I used outline die from Build-A-Flower: Chrysanthemum to cut an opening for the Happy Easter sentiment to peek through.
  • And decided a kiss of Buttercream ink needed to be sponged lightly around the words. 
  • A quick inking of the Layered Kaleidoscope Stencil B with Buttercream was given for a bit of visual interest. the senciling is so faint, it was difficult to photograph. But it IS delightful:))


  • Then I inked each layer of the lovely Build-A-Flower: Chrysanthemum with: Pink Pearl for the first 2 layers, then Coral Bliss and Coral Berry for the final detailed layer. The leaves are inked with Ocean Waves, Aaqualicious, and Teal Cave.
  • Cut everything out with the dies in the set.
  • I LOVE how the second layer of the Chrysanthemum die allows for some of the petals to be popped up:))
  • After placing the bloom and leaves on the stenciled panel I embellished with Enamel dots and sequins and Gold Glitter tape,

This completes my fairly simple card which is for my Mom and Dad...Mom is in Hospital for 5 days with a new treatment for her Lymphoma. They were sad to have missed all the Easter festivities this year. However, we believe every new morning brings JOY  in having a risen Savior! Our hope for eternal joy and perfect health with Christ in Heaven makes these earthly days of struggles more bearable.

Thanks for stopping by!

LauraJane:)


Links are part of affiliate program with Altenew. Which means I earn a small commission at no additional cost to you every time you click through and purchase product(s) linked in this post. Thank you for your support!

Over at The Ton

Check out my post over at The Ton blog today:)
I'ts really toot, TOOT SWEET!
Thanks for stopping by!

Inspired By ALL the Little Things 82


Hello Everyone! Isn't that inspiration photo BRIGHT and CHEERY?!
Just what we need when the clouds are gray and temperatures are still chilly.
I was very much inspired by the Spring colors and all the BLOOMS. For my card today, I created with a stamp set from Close To My Heart and a happy mix of pattern papers.

This came together beautifully with some extra die cuts from PTI and ALTENEW. The sequins are from The Ton:)

Beautiful You Stamp + Thin Cuts

I was given an extra Beautiful You Stamp + Thin Cuts to GIVEAWAY! Leave me a comment at the end of this post for a chance to win it!
Kelly Lunceford is our featured designer for the month of March. Stop by the IBATLT blog to read more about her:))
Hope to see your creations in the gallery at Inspired By All the Little Things!

The linky will close on Friday, March 30 at 11:55am. (PST)


Thanks for stopping by!


On sale for MARCH at CTMH
Thin Cuts dies are the fast and easy way for cutting shapes for all your crafting. This month only, save 25% on all available Thin Cuts, and 30% on select bundles of Thin Cuts dies. 

One for HIM and one for HER using SPELLBINDERS


Hello!  The peeps at at Spellbinders sent me the DIE D-LITES BOLTS & NUTS ETCHED DIES and DIE D-LITES BEVERAGES ETCHED DIES to play with. So much fun creating with both sets!

Here is what I came up with:))
One for the manly men! With a few quick spritzes of Shimmerz sprays, the background was created, then stamped..Popped the Die cut Bolts and Nuts on to, trimmed and mounted it onto a dry embossed panel. Sentiment banner is the good ol' label maker from my childhood stash:) Embellished with NUVO drops.

 And one for the Ladies:)) Stamped CHEERs from The Ton onto pattern paper from Carta Bella Spring Market. Inked the BEVERAGES ETCHED DIES with Crisp inks and colored with Artistic Markers from Altenew. The 'bubbles' are Nuvo Drops.

With St Patty's day coming, I thought the green beverages were appropriate!! However, I drink and eat GREEN all year long:) Here's to your Health!

Thanks for stopping by!

Happy Thoughts at The Ton

I have a pretty Spring card over at The Ton Blog today:)) I'd be tickled if you would stop by to check it out!!
Here's a Sneak peek:

Have a GREAT day!

LauraJane:)

STAMPlorations Challenge: Spring


Hello STAMP fans! I have a card for the new challenge at STAMPlorations.
The theme for the month of March is SPRING.
Using Sweet Spring Wishes Phrase Die and BLOOM SILHOUETTES stencil and shimmerz sprays, with a hint of Ziggy markers:))


RULES of PLAY:
Rather than all of our normal monthly challenges at STAMPlorations, there will be just one challenge for you to join each month. The challenge will have a theme and as long as you follow the theme, any type of project is welcome!

Thanks for playing along!
LauraJane:)


Inspired By Challenge 81

Hello everyone! 
I'm excited to share a card created for 

Inspired by the many shades of Green and Scripty Labels on the bottles, I reached for the new Green Meadows Crisp inks from Altenew. and the Layered Rose die. 
But first I wanted to try out the new Wreath Builder Template created by Gina K Designs:))....FUN way of stamping a symmetrical Wreath using a stencil as a guide! Check out the video here. The kit is now in Pre-order only..but Well worth purchasing!  So, peeking out from behind the Rose cluster is a perfectly shaped wreath of  Heart Flowers from Altenew. 
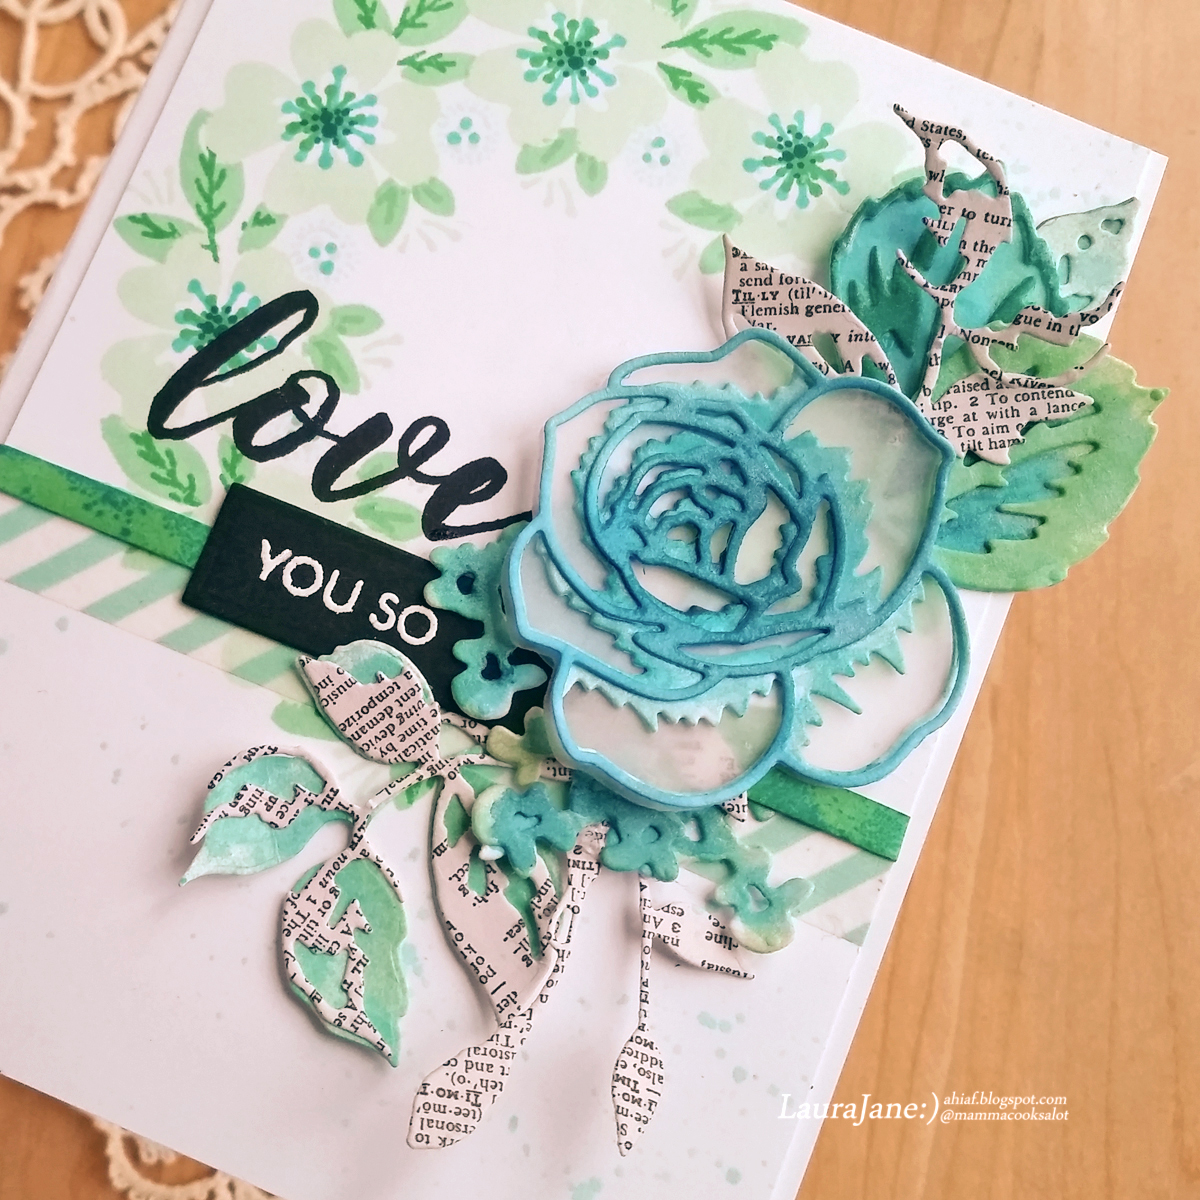
The Layered Rose and leaves are colored with Shimmerz Sprays and Inklingz.

Here is the finished Card:

 Some extra leaves die cut from the Rose Flurries 3D die set cut from Scripty pattern paper as a nod to the inspiration photo.

How are you inspired by the photo?

Kelly Lunceford is our featured designer for the month of March. Stop by the IB blog to read more about her:))

The linky will close on Friday, March 16th at 11:55am. (PST)

Some simple rules to keep things organized and enjoyable:
  • Please use the graphic for your post and link back to this post.
  • Any posts that are offensive will be removed.
  • Please comment on the submissions of others...we all love the support!
  • Yes, you can combine with other challenges but NOT other inspiration challenges, please.
  • Have fun and challenge yourself!!

Thanks for stopping by!

March card challenge at The Ton

Happy March!!  Can it be the third month already??
Today starts a new challenge at The Ton Challenge Blog.


Yes, SPRING fever is upon us:)) and I'm only too happy to create with the fresh new
Best Day Ever Floral Coverplate Die. As you will see I took MANY steps to complete the card...I think one could stop at any one of them and have a simply splendid card, but continuing the creative process is always FUN!

Here is the PROGRESSION of my card:

First, I stamped Magnolia Fields Cling Background with Violet Fringe Couture Color onto purple CS and then Heat embossed with Clear EP.  Then I cut the Best Day Ever Floral Coverplate Die from two layers of #110 white CS and trimmed them with the Double Stitched Rectangle Dies (Large) and put the layers together on top of the Purple stamped background with liquid glue. 

Makes a very Lovely CAS presentation:))
Next, I decided to add the "petals" of the magnolias from the die cut Coverplate back into place.

And then wanting to make the sentiment stand out a bit more, I cut the Coverplate again from the same purple CS as the background and fussy cut the words from the rest of the foliage.
Thinking the purple faded away as you can see below;

I embossed the purple fussy cut words with Clear EP and glued that to the card front just off-set, for a white highlighted effect. That looks GOOD!
Not ready to quit yet, I took the purple layers of "petals" and added them to the Magnolias over the top of the white ones.
To finish the card up, I quickly colored in some details using a Sparkle Marker from Glitz and Glamour.
There we have it!  My DH suggested adding a layer of BLACK CS for the sentiment..but I ran out of time. Where would you have stopped? Do you think I went too far? Inquiring minds want to know:))

You have ALL month to play along at  The Ton Challenge Blog using the CUE WORD:SPRING. Hope to see you joining us in the gallery!

How to Play

  1. You must use a Ton product as the main focal point of your card or tag.
  2. Display the cue word and mood board on your post and include a link to the challenge in the body of your post.
  3. Link your card to the new link up tool each month. 
  4. There is no limit on the number of cards/tags you wish to enter into the challenge.
  5. The winning project will be chosen based upon detail, composition and aesthetics.
  6. Challenge winners and Honorable Mentions will be announced during the introduction of the subsequent challenge.
  7. Winners will be invited to be a guest designer for the next challenge.
YOU could win a $50 spree to The Ton’s shop!”
*Gift certificates only apply to The Ton stamps, dies, ink, gilding and embossing powder.

Thanks for stopping by!