Find me on these platforms

Altenew Dynamic Die Cutting Blog Hop + Giveaway


So excited to be a part of the Dynamic Die Cutting Bloghop at Altenew! I challenged myself to see if a card could be created with no stamping, Just Dies! If you are hopping along from the beginning you should be arriving from Aga's blog.
*******************************************
Here is what I came up with using all these lovely dies from Altenew:
Just a few coloring mediums and a kiss of washi and Thread :)


To make the card:

While the flower pieces dry:
  • Covered an A2 sized cardfront with Peach Gold Washitape
  • Ran that through the cutting machine using the Cross Stitch Canvas Die
  • Then added the sentiment from Circle Embroidery Hoop Die, run through the machine again
  • Stitched the sentiment with GOLD thread..the washi tape makes the paper more sturdy for stitching :)
  • Cut the HOOP from Circle Embroidery Hoop Die from brown and gold CS and assemble, 
  • Adhere to the stitched card front and add more brown CS to create a "basket"
  • Add more color to the dried floral pieces with Artist Markers
  • Assemble each flower
Now I spent some time arranging my bouquet of blooms:)


I LOVE how this card came together, and how therapeutic all the die cutting was!

Hope you are inspired to create with Dies on your next project!


Prizes
Altenew is giving away a $30 gift certificate to five lucky winners! Please leave a comment on the Altenew Card Blog by Wednesday, October 31st for a chance to win. Five winners will be announced on the Altenew Card Blog on 11/4/2018.

One more Giveaway:
I will draw a winner from comments left on my post to receive a $20 gift certificate, donated by Altenew. The winner will be announced here on this post blog by 11/2/2018.


We have a WINNER!
Wow-ee! This is impressive. Gorgeous colors.

Congratulations Krista! Please contact us at winner@altenew.com by 11/15/2018 with the subject line Altenew Dynamic Die Cutting Blog Hop Winner from LauraJane's Blog.


Thanks for stopping by. Hope your day is Blessed!
****I am part of Altenew's affiliate program. Which means I earn a small commission at no additional cost to you every time you click through and purchase product(s) linked in this post. Thank you for your support!
  

Entering the October 2018 Inspiration Challenge at Altenew
Altenew-OctoberInpirationChallenge-2018

You can also find me:
Instagram @mammacooksalot  
YouTube: Mamma LauraJane.

Playing with Cut & Emboss Folders from Spellbinders


Hello Friends! I took a break from stamping to create with two Cut & Emboss Folders from Spellbinders. I had forgotten how therapeutic simple papercrafting can be!
Here is what I came up with :)
 Inking the Folder first with a peach colored ink then running it through the machine, gives a beautiful soft panel of color to the card front. The LOVE word die is from is from the ROSE BIRD TOPIARY ETCHED DIES FLOWER GARDEN set.

 For the next card, I ran just half of the Folder through my machine to emboss and cut the lower part of my card front. On the top half, I added some Washi Tape embellishments and several layers of pattern paper strips. Placing a bit of washi tape behind each cut-out adds a nice pop of color to teh panel.

Moving on to the next Cut & Emboss Folder:

Dotted Lace Cut and Emboss Folder
Dotted Lace

 This time, I brushed the same Peach colored ink over the top of the Embossed and Cut card front for a kiss of color to the raised elements on the panel. Then I layered it over a card base colored with the peach ink as well. I love how easy it is to achieve texture and cuts all in one pass of the machine with these folders! The banner and word die from ROSE BIRD TOPIARY ETCHED DIES FLOWER GARDEN set worked beautifully with this card too.

And for one final EASY card:
 Again, I only put half the folder through my cutting machine for the top of  this cardfront. Keeping it simple with white on white with some Washi peeking through the cut areas on the cardbase behind it. The die from the August Large Die of the Month Kit added a sweet medallion to the front along with two LOVE word dies. A single Nuvo Drop Dot to the center and I called it a beautiful finish:)

***These cards actually got a nod of approval from the DH! He likes how productive my session was in the craftroom today:)) It was super easy with the Cut & Emboss Folders from Spellbinders.
Thanks for stopping by!

Until next time, may your days be Blessed!

LauraJane :)


A Tribute for Melissa Lane


Melissa Lane, who passed away October 2, was a talented mixed media artist, fellow teammate at STAMPlorations, homeschooling Mum, and sister in Christ. She was passionate about sharing her creative journey with the focus and wonder on Our Creator.  I greatly admired Melissa for her ability to share her faith in Jesus Christ.
While it was a shock and saddened to hear of her sudden passing, I do know she is spending eternity in Heaven, just as our Savior promised!

My deepest sympathy goes out to her Husband Chris and their 4 children. Just because we KNOW that Melissa is in a better place, doesn't mean grief is not a struggle. Since my own mother's passing in June, I empathize with you all.

Thinking of the Lane family while worshiping the other day. Singing Touch the Sky, by Hillsong United, I was inspired to make the card below. 


Remembering during days filled with shadows, 1Sa 30:6b  But David strengthened himself in the LORD his God.
And keeping in mind Jer 29:9 For I know the plans I have for you, declares the LORD, plans for welfare and not for evil, to give you a future and a hope.

Our LORD will be gracious and will give you peace as you walk through this time of grief. Praying you stay focused on Him.

With much love and Sympathy,

LauraJane :)


If you knew Melissa when she was alive -- maybe you were on the same design team(s) or you were bloggy friends -- however you knew her, we'd like to invite you to join us in celebrating her life by creating a butterfly card in her memory.

You may blog about the card you make as a tribute to her or not, but either way, you can add your card to Melissa's Butterfly Gallery that will be found on the tribute post at STAMPlorations. The linky will be open until October 31.

For more information on where to send your card go to the STAMPlorations' Tribute post.

Capture Moments Hoop and Card

Hello Everyone!  
After pondering  over a project to feature for the final step of Level 3 for AECP , I ventured to teach a card and stitching combo, using Mini sets from Altenew. 
So many, if not ALL of the sets, mini and larger, have SO much stitching potential! There just isn't enough time to get my ideas down on paper, let alone in a hoop! I have found the dreaming and planning of them to be almost as enjoyable though!

Here is a photo of my finished card and hoop using the Capture Moments set.


Here is a Video..of the process, watch it below or in HD at my YouTube Channel .


Supplies List:
 Instructions:
  1. stamp the camera image from Capture Moments onto A2 size Cardstock with Rocky Shores
  2. add the sentiment, stamping happy with a shade darker....Mocha
  3. color quickly with the Artist Markers
  • Repeat the first three steps onto the Fabric ...changing the color and position of the sentiment if desired
  • Place the stamped and colored fabric in a hoop and begin stitching
  • Simple stitch Suggestions
  1. Satin 
  2. Wagon Wheel Rose
  3. French Knot 
  4. Seed Stitch 
  5. Back Stitch
  6. Split Stitch
After stitching is complete:
  • take the fabric out of the hoop 
  • using the outside of the hoop as a template, trim fabric down with scissors
  • color outside hoop ring with Artist Markers
  • place the finished stitched project back into the colored hoop, make sure fabric front is nice and tight, no wrinkles
  • flip hoop over and glue the raw edges of fabric onto the backside of the hoop, being careful not to get glue onto the stitched area
  • cut the largest of the Halftone Circles Nesting Dies from coordinating paper
  • add some stamping to the cut circle..don't forget to add you name:))
  • glue paper circle to the back of the hoop
Finish the card:
  • add a few finishing touches to the card front..I added a pop of color on the edge with marker  and repeat stamped words around the camera after cutting a simple mask
  • using the tape runner, adhere to the card base
Now, present your handmade gift and card to someone you love:))

I am so pleased to have reached this level of the Altenew Educator Certification Program! Both Virginia and Nicole have been gracious and encouraging along the way. Thank you!


Check out these posts if you like my 'Card to Hoop' projects!
Click the caption below each photo to betaken to original post
Guest Post for Altenew Card Blog

Refresh Your Alcohol Markers

Build-A-Flower: Peruvian Lily

Recap of just my Hoop Art :)
Click the caption below each photo to betaken to original post
Altenew July 2018 Stamp/Die Release

Altenew Build-A-Flower: Flourishing Zinnia

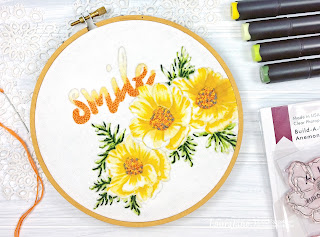
Build-A-Flower: Anemone Coronaria


Thanks for stopping by. Hope your weekend is Blessed!
****I am part of Altenew's affiliate program. Which means I earn a small commission at no additional cost to you every time you click through and purchase product(s) linked in this post. Thank you for your support!
  
You can also find me:
Instagram @mammacooksalot  
YouTube: Mamma LauraJane.

The Ton’s Fall 2018 Release Blog Hop

HAPPY World Cardmaking Day!!
Welcome to The Ton’s Fall 2018 Release blog hop! For this release, The Ton has debuted 11 new stamps and a new pop up floral die. There are free gifts with purchase promotions also! There’s also a little surprise for today since it is World Cardmaking Day. Head over to The Ton’s blog for more details.

I'm so happy to be a part of the Bloghop celebrating the new release at The Ton:) There are so many new goodies to suit any style of crafting! Two stamp sets made it to my desk to play with... Take a look:
I had the pleasure of coloring Gardenia Wishes with Zig  markers:)


  Inked into a A2 size Solar White cardstock.
 It's almost a one layer card! The sentiment is heat embossed on a strip of Vellum, layered over white cardstock and wrapped around the cardfront.
***********************
If you are getting in the Holiday Spirit, the Wonderland Print Stamps are just the ticket for creating quick cards!

 The extra single images make it fun to fill in the spaces to make a FESTIVE background!
 I LOVE how easy it is to ink the multi image stamps with different colors and layer them up for  knock-out interest.
Another Onelayer card begun on Solar White cardstock.
Distress Oxides: Abandoned Coral, Candied Apple, and Fossilized Amber
The Ton Couture inks: Soft Garden, Everglades Moss, Deep Emerald, Caribbean Turquoise, and Bright Emerald
I hope you enjoyed my creations today and remember to leave a comment as you HOP along for chances to win!
Giveaway Prizes..
For today’s hop, there are giveaways on each stop so be sure to leave a comment on each blog for a chance to win a stamp set of choice from our new release! The comment period for this giveaway will close on Monday, October 8 at 11:59pm EST. 

Bloghop List:
  1. The Ton Stamps
  2. Svitlana Shayevich
  3. Olga Matyushevskaya
  4. Renee Day 
  5. Anna Kutcenko
  6. Kymona Tracey
  7. Brenda Noelke
  8. Ilina Crouse 
  9. Amy Tsuruta 
  10. Tae Eun Yoo
  11. Amy Kolling 
  12. Laurel Beard 
  13. Chris Dayton 
  14. Lisa Harrolle 
  15. Laura Jane <<YOU are here!
  16. Vera Yates
  17. Janette Kausen 

Thanks for stopping by!
LauraJane:)

STAMPlorations October Theme & Sketch Challenge

Hello friends! Now that October is here, the challenges at STAMPlorations have started back up. So get your STAMP goodies out and play along :)

Stamps and AUTUMN is the THEME:


Here is the sketch:


Here is my take on the THEME. 
STAMPloration Supplies used:Trendy Leaves 2 
SET YOUR AFFECTION

I layered the middle sized Crazy Double Running Stitch Rectangle Nesting Die on top of the largest for the second card as a variation:)
Hope you have enjoyed my creations today!
Can't wait to see what you create for the Theme & Sketch Challenge! Your project can be based on the theme or the sketch or both.

THEME & SKETCH CHALLENGE GUIDELINES
This challenge starts on the first Friday of the month and ends on the last day of the month.
  • Link up any type of project(s) based on the theme, the sketch, or both.
  • You must use stamps in your project(s) -- rubber, clear, or digi from any company. Non-STAMPlorations stamps are OK.
  • Link up to 6 entries and link up to as many other challenges as you want.
  • You must display the challenge graphic in your post (if linking from your blog) and link back to the challenge post (not just the main blog) in order to be eligible to win (and receive the corresponding prize).
  • Link up by the last day of the month, 11:55 p.m. Pacific.

Be sure to check out ALL the challenges at STAMPlorations : 
MixedMedia*CUTplorations*TAGplorations*CAS CardS
Join in for more chances to win prizes!

Thanks for stopping by!