Good Monday afternoon to ya!
Today I have a card that came together like a Dream with
GLAD PRESS 'N SEAL.
GLAD PRESS 'N SEAL.
***No, This is not a commercial****
I took several photos to show you what I mean,
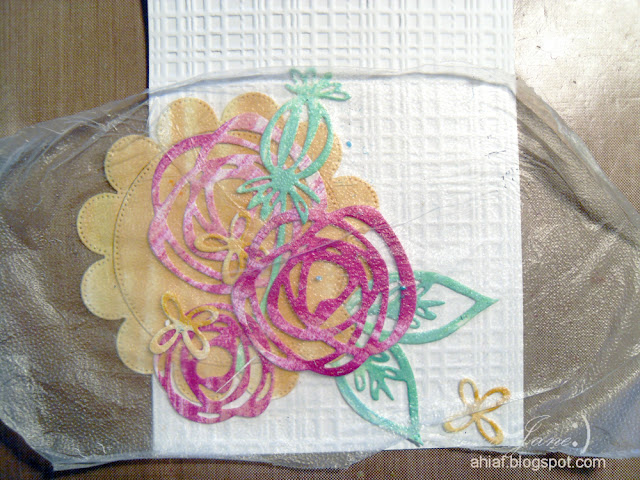
First I arranged several Essentials By Ellen Die Cuts to make a collage on top of my cardbase, which already had been dry embossed and a Yellow Flower Circle die adhered to it.
Then I took a piece of Press'n seal and pressed it firmly onto the dies.
Then carefully lifted all the pieces off the cardstock.
Each die still remained in the position I wanted it top be. This is the underside of the collage layers.
Now It's ready for adding glue.
The final step is to place it back onto the cardbase pressing firmly to adhere the layers and gently peel off the Press 'n seal.
As you can see on the finished card,
I did place a strip of Washi across the Southern part of the base before adding several stickers for a sentiment.
And the collage it'self, migrated more to the north. However it DID remain together as I had first arranged it.... and I was able to add glue without having to figure out where each piece fit individually.
Easy Peasy!
Thanks for stopping by!
LauraJane:)
Linking up to
The colors are very Tropical:) Summer is not over for everyone!!


6 comments:
What a pretty card and thanks for the great tip!
Thank you for the great tip! I always struggle with that, I place my dies/cut flowers and then when I glue them they are not there where they should have been. Love your card too!
I love that EF and the bright colors of this card. Thanks so much for the tip of Press N Seal. You are very creative.
Gorgeous take on the pin-board and so clever with the press n seal! I need to buy some of that stuff!!!
Great card and great use of the press n seal! :)
gah! Brilliant!! and beautiful too ;)
Post a Comment